
3 Ways to Colour Stampin’ Up!’s Artisan Sketched Garden DSP: Weekly Class To Go
- loritamariecrafts
- May 22
- 3 min read

If you love patterned paper that you can completely customize with your favourite colours, this week’s projects are going to be so much fun to recreate! ✨
I used the new Artisan Sketched Garden Designer Series Paper for this week’s Weekly Class To Go — a black and white floral paper pack filled with hand-drawn designs and coordinating patterns that are perfect for colouring.
For these cards, I wanted to explore a few different ways to use the paper, so each project features a different colouring idea and a different colour combination. From simple colouring directly onto the DSP, to fussy cut floral elements, to creating a coloured background, these projects really show how versatile this paper can be.
One of my favourite things about black and white DSP is how easy it is to make it match your style, your colours, or even supplies you already have in your craft room. Just changing the colours gives the paper a completely different look every time!
Be sure to check out the video below where I share all three cards and walk through the different colouring ideas and techniques I used.

Card 1:
For the first card, I wanted to show how to spotlight one section of the DSP. I chose the pattern with the poppies - such a fun flower! For easy & fun colouring, grab some Stampin' Blends in your favourite colours.
Colour Combo: Peaceful Pine, Crisp Cantaloupe and Petal Pink.
I love how rich the pattern looks when you colour in the background too.
Can you picture this card in your own favourite colours?


Card 2:
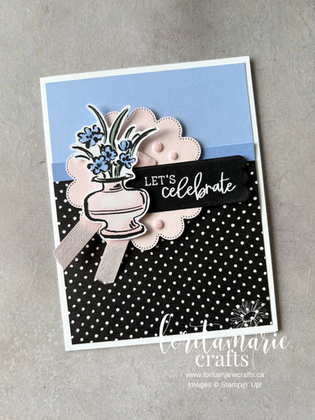
There are a couple patterns in this DSP that are perfect for fussy cutting. I love the one with all the vases - perfect for adding a simple floral element to any card or tag!
Colour Combo: Hydrangea Hue & Barely Blush.
Don't forget to use the other side of the DSP for fun black & white coordination. For a more intense look, use the ones that are mostly black. To lighten it up, use the patterns that are white backgrounds.
Be sure to check out the video where I changed a few things up on this card.


Card 3:
This card shows how you can also use Blending Brushes to add larger swatches of colour to this paper. I started in the middle with Crisp Cantaloupe and moved out into Golden Glow. I love how when you blend this way you also get a mix of the colours together.
Colour Combo: Golden Hue & Crisp Cantaloupe
To add another layer of interest, you can fussy cut out a flower from one of the other patterns and add it behind the sentiment.


Bring the Crafty Fun Home — Free Class To Go Details
If you’d like to make these projects yourself:
You can place a qualifying order with me between Thursday, May 21st and Wednesday, May 27th and you’ll get this Artisan Sketched Garden Kit for free — my thank you for crafting with me!
Click here for the full supply list to see what I used on this week's projects.
This kit includes all the pre-cut paper to make 6 projects, 2 each of 3 designs, plus a handmade card from me! You’ll just add your own stamps, inks, and adhesives. (No stamped images included, per Stampin’ Up!® policy.)
How it works:
Place a $50+ order to receive the free card kit with local pickup.
Place a $65+ order to have your free kit mailed to anywhere in Canada.
Orders close Wednesday, May 27th, and I’ll mail the kits by the end of the following week. Then we start fresh every Thursday at 12 PM MT with a brand new class and set of projects to inspire you!
Don’t forget — if you’re on my email list, you’ll get a free Friday PDF with all the measurements for this week’s cards so you can easily recreate them.💌 Sign up here
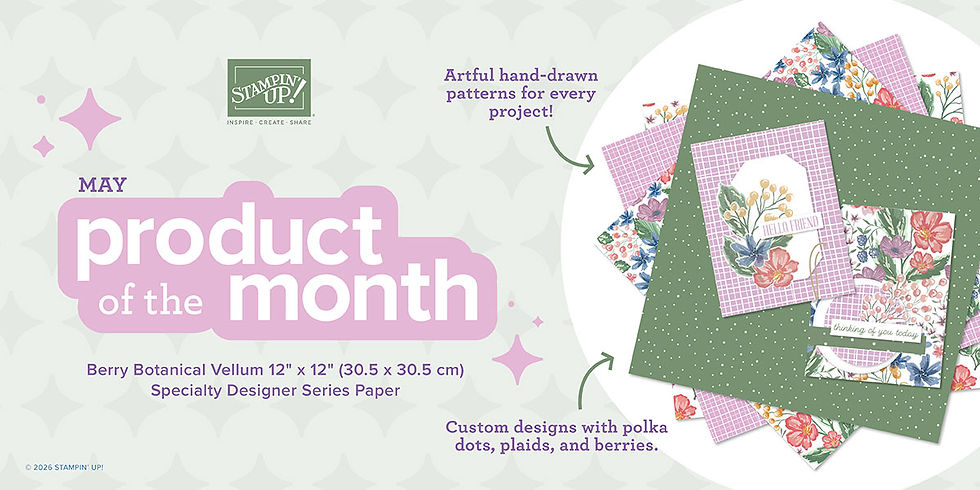
💛 Have you heard about the Product of the Month?
Spend $100 and you can add Stampin’ Up!’s Product of the Month for only $7.
Click here to see this month's Product of the Month. Available while supplies last!
YouTube Replay:
Thanks for hanging out with me here and happy crafting!


Comments